How to Air Fry in Nuwave Pro Plus
How to air fry in Nuwave Pro Plus? The Nuwave Pro Plus is a bit different compared to the other air fryers. As a result, it can be a bit hard for you to utilize the device for the first. Well, don’t worry, we are here to help you.
In the below part of the article, we will let you know how to work on the Nuwave Pro Plus air fryer. Keep going through the article to find out the process of using the air fryer.
How to Air Fry in Nuwave Pro Plus
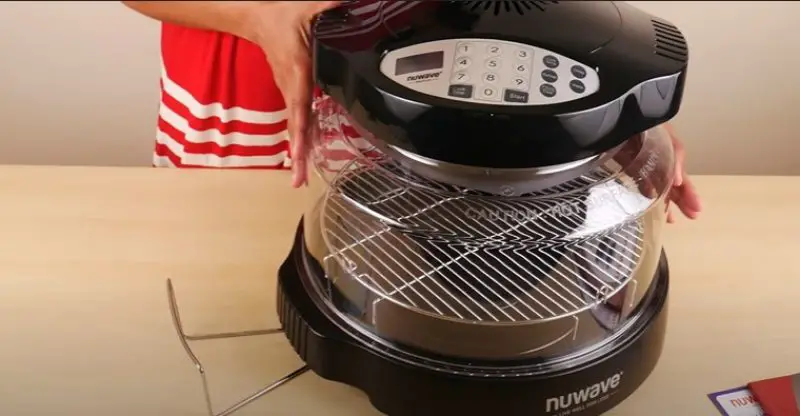
Nuwave Pro Plus is a bit different device when compared to the usual air fryers. It is a versatile cooking appliance that is suitable for different types of cooking. It utilizes conduction, infrared, convection cooking techniques to give you a perfect cooking outcome. There are different settings in the air fryer which include the warm, delay, reheat, and much more. One of the interesting aspects about the device is you can cook in it for 10 hours in a row. The cooking duration can be set from 100 to 350 F with 1-degree increments.
If you have just purchased the Nuwave Pro Plus air fryer, you should go through its user manual to find out the correct way of using the device. However, if you want to learn the basic process of air fry on the Nuwave Pro Plus, keep going through the below paragraphs. You will find how to use the air fryer in easy steps.
Before You Begin
If you are using the air fryer device for the first time, you should begin with the below-mentioned works.
- Remove all the packaging materials from your air fryer. Also, remove the stickers on the parts. Before cooking for the first time, make sure to rinse clean the air fryer attachments properly.
- Never position the device or any of its parts in your stovetop, oven, or any other heat source. They might be damaged.
- Make sure the cord of the device is plugged into an efficient and properly grounded outlet. The cord shouldn’t touch any of the heat sources.
- Check the liner pan and make sure it is properly placed within the base. Put back the dome on the base when you are done with cooking.
- Never touch the dome or any other surface of the cooking area when cooking is ongoing. They can become very hot and may burn your fingers.
- Don’t open the dome or the powerhead while cooking is going on. Turn off the power source before removing them.
Starting the Device
First, set up the device as mentioned in your user manual. Also, add the food you want to cook inside the device.
When you are ready to cook, put the device on a heat-resistant surface. Connect it to the electric outlet. You should see 0 in the LCD display when it is turned on. Then you need to set the duration for cooking. Press the Cook Time button on the machine and then enter the preferred duration for the cooking. Then you can press start for the cooking.
By default, the cooking will begin at 350 F temperature. If you want to cook at another temperature, you need to adjust the temperature through the Cook Temp button. Once after setting the Time and Temperature, you are ready to begin the cooking.
The Cooking
You need to press the start button to begin the cooking after adjusting the duration and the temperature. You will find the remaining time for cooking on the display of the device. After cooking for the set duration, the air fryer will automatically stop. You will also hear a beep sound that is to notify you about the completion of cooking.
Pause/ Clear Cooking
The Nuwave Pro Plus allows you to pause the oven while cooking. To do this, you will require press the Pause/Clear button. This will pause the cooking and the remaining cooking time will not decrease. To clear the cooking time, you will require press the pause/clear button two times. The remaining time for the cooking will be removed from the display immediately and you will see 0 like earlier.
After cooking for the required time, you can stop the device and take off the food to enjoy. Note that there are some specific functions or modes in the air fryer, which you can also use as needed. To get the best outcome, it is recommended by the manufacturer to remove the food immediately after cooking to rest. Resting helps to prevent overcooking of the good. Resting helps the food to make the food moist, tender, and perfectly juicy.
Here is what you need to do – simply remove the food from the oven and then transfer it to your serving plate. Make use of a foil to cover it loosely. This helps the juice of the food to be redistributed perfectly. How long you need to rest the food will depend on the variation of the dish. As the roasted and whole roasted chicken need to be rest for around 15 to 30 minutes. While smaller dishes like steak, breasts, etc. can be rested for around 5 minutes.
Can You Use Oven Bags in the Nuwave oven?
The answer is yes, you can use the bags in the oven. Most of the oven bags out there are suitable for conventional oven up to 350 F temperature. The default temperature of the oven is 350 F. That means you can use the bags without any issues.
Is Nuwave Pro Plus Worth It
The Nuwave Pro Plus is a multi-functional oven that is suitable for a variety of purposes. It also uses different variations of technologies to cook your food efficiently. Available at a reasonable budget, we believe the device is a worthy investment.
Conclusion
The Nuwave Pro Plus is pretty easy to use as you see. Apart from following the above guide, we really recommend you to go through the user manual of the air fryer. This will help you to get the best out of the air fryer.


