How to Use Philips Air Fryer
Air fryers have become a popular alternative to traditional frying methods using stovetops and ovens. If you’re unfamiliar with this device, you’d be amazed by what this compact tool can do. It offers a faster, better, and more uniform frying experience without the need for oil. Furthermore, when it comes to air fryers, Philips stands out as one of the leading brands in the market.
If you want to know how to use Philips’s air fryer, keep going through the article. Below, we will let you know how to get the best out of your Philips air fryer. Along with that, we will also let you know how the device works. Keep reading the article to become a pro with your air fryer.
So, How Air Fryer Works?
As the name recommends, the air fryer is something that utilizes hot air to fry things. Such an operation makes it identical to your conventional ovens. However, when compared to the ovens, the air fryer passes hot air through your food while the oven traps the food in hot air while cooking. Although smaller than the ovens, the air fryer can produce the same or sometimes even more power to fry your foods.
What makes the air fryer even better is they are much less messy while also requiring no or a little oil for deep frying the foods. Now you might think that the frying thing is the only thing you can do in the air fryer. Well, it is much more than that. You can control the brownness, reheat leftovers, and do much more things with the cool device.
How to Use Philips Air Fryer
Based on the type of display, there are two varieties of the Philips air fryer. Below, we will let you know how to utilize both varieties of the air fryer in step-by-step instructions.
How to use your Philips Avance Airfryer XXL (digital display)
The Philips Avance Airfryer XXL is a recent model of the manufacturer. It arrives with a digital display and allows you to control the works more efficiently. Here are the steps you need to follow to cook or warm things with it.
Step 1: Turn on the Machine
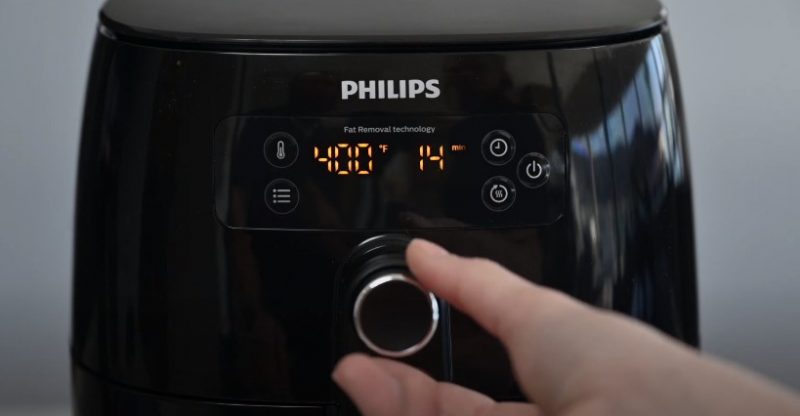
Begin with connecting the air fryer with an electric outlet. Then push the on/off button on the machine. Now you can select the desired settings for cooking. There should be several presets for the common foods. You can also select the settings manually. Press on the QuickControl dial to do this. After doing so, the cooking time with being indicated through a blink on the screen.
Step 2: Adjust the settings if needed
If you want to adjust the cooking time, utilize the QuickControl dial on the air fryer and set it to desired settings. After selecting the time, you can control it by pushing the same dial. Make sure to set the right cooking time based on your recipe book. You can also find information about cooking time in the user manual.
Step 3: Adding the Food
Add the food to the bucket of the air fryer. Make sure to put the food in a single layer for an even cooking and impressive color. Adding excessive food will result in burnt and uneven cooking. If you require preferring larger serves, you can cook in smaller batches for the best result.
Step 4: Complete the Cooking
Once you add the ingredients, the machine will start to begin. And, it will stop the cooking in the exact time you have set. Afterward, you can take out the food to enjoy or store.
Step 5: Keeping the food warm
There is a nice option in the Phillips air fryer that allows you to keep the dish warm you cooked in the air fryer. Note that this function is not reheating, instead, it utilized low temperature to keep the food warm.
Once you turn on the keep warm mode, the fan and heater of the machine will turn on automatically in a time interval to keep the food hot. The mode can keep you cooked for hot for around 30 minutes.
How to use your Philips Viva Airfryer XXL (analog display)
The Philips Viva Airfryer XXL arrives with an analog display and no wonder that it is a bit old model. Here is how to utilize the machine to cook your food:
Step 1: Starting the Cooking
Turn on the air fryer after connecting it to electricity. Now begin the cooking process by setting the temperature by utilizing the temperature control knob. It is at the top of your air fryer. After that, turn the timer clockwise to set the time. You will find it on the front of the air fryer device.
Step 2: Set the Cooking Time
Select the suitable temperature for the cooking based on the recipe books or the user manual. Setting up the time can be a bit tricky if you need less than 10 minutes of the cooking time. Begin with setting the time more than 10 minutes by turning the knob. After that, turn the knob counter-clockwise to set the smaller duration.
Step 3: Adding the ingredients
Well, this process is simple and fully the same as the previous procedure. Simply, add the food to the food basket of your air fryer and put it back in the right way. Once done, you can begin the cooking operation. Note that you will re
Step 4: Completing the Cooking
The cooking with be automatically stop once cooking the mentioned period. However, if you want to stop the cooking before the settled cooking time, you will require turning the time knob to zero. This will stop the cooking immediately.
Conclusion
The air fryer is something that can completely change the way you fry foods. And, that too in a positive and healthy way with little or no oil. If you are utilizing a Phillips Air fryer, make sure to utilize it in the right way to get the best performance out of it. We hope you will find the above instructions effective and easy.


