How To Use A Nuwave Air Fryer
How To Use A Nuwave Air Fryer The Right Way
We’re diving into the workings of a specific air fryer today. Can you take a stab at which one it will be? If you guessed wrong, don’t worry – we’re focusing on mastering the Nuwave air fryer. Before you do anything with your brand new Nuwave air fryer, the initial step is to thoroughly go through the owner’s manual. This is crucial because it helps you get a better grasp of your air fryer‘s capabilities. Additionally, it enlightens you about what your air fryer cannot accomplish alongside the functionalities it offers.
Unboxing The Nuwave Air Fryer
Before you use a kitchen appliance, you should clean it with mild dish soap and rinse it with water. Please don’t wash the actual air fryer, you will not even get a chance to use it. Wash the accessories of the air fryer like the base tray and basket. Wipe the actual air fryer appliance with a damp cloth.
The next thing you want to do is find a place that is heat resistant, a flat surface that you can put your air fryer. Preferably the kitchen, you can put it anywhere you want. If you don’t put it near a large body of water, then you will be fine.
Put all your accessories back into the air fryer, like the basket and the tray. If you’re having a problem putting back your accessories then you will need to reread your manual. That way, you can put it back together.
I do hope that you had placed your air fryer near an electrical socket so that you can plug it. The Nuwave air fryer cord is 4 feet which is easy to plug into that hard-to-reach socket.
Operating the Air Fryer
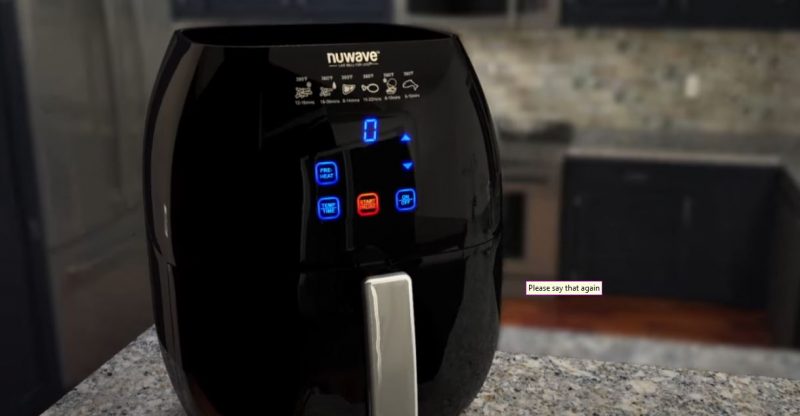
Once everything is connected and you’re ready to turn on the Nuwave air fryer. On the digital touchscreen of the air fryer, press the on/off button to turn on your air fryer. Once you’ve done that you should see 0 on the digital screen. This will indicate that you are ready to cook and can now select a time and the cooking temperature.
- If you want to turn it off, you can use the same button that you use to turn it on and to turn it off as well.
The next thing that we are going to do is take out the tray. You can take out the tray by sliding it out via the handle. Once you learn how to take out the tray, you can put your food on the tray, once you’re done then slide it back in with the food on the tray.
On your digital screen press start/pause to begin cooking, when you do it like this, your Nuwave air fryer will cook on the default setting. Your temperature and your cooking time are preset by default, your default settings will cook your food for 10 minutes at 360°F.
- The next section will discuss how to manually change your temperature and cooking time
If you want to pause your cooking time, you can simply press the start/pause button. Let’s use an example, say that your cooking chicken or beef and you want to check what the internal temperature is by using the thermometer. All you have to do is, press the start/pause button and take out the chicken or beef to check.
- To resume your cooking press the Start/Pause button.
- The time and temperature setting will be cleared if you press pause and didn’t press any other button.
Let’s continue with our scenario above, so, your chicken or beef has reached the internal temperature that it needed to be considered cooked. There is no need for you to put the food back into the air fryer, just press the on/off button to turn off your air fryer.
Set The Cooking Time And Temperature Manually
Let’s say that you got your recipe from off the Internet or from a cookbook and it comes with its own cook time and recommended temperature that you should cook your food. What are you going to do if you’re not able to manually set your own cook time and temperature on your Nuwave air fryer? Have no fear, that’s what this section will teach you.
Temperature Change
On your digital screen press temp/time once, to take control of the temperature and time. Use the up and down arrow buttons to set your temperature to where you want it.
- When you’re using the up and down arrow button to change the temperature if you press the air button once or slowly, it will either increase or decrease by 5°F for each time you press it.
- Holding down on the arrow keys, whether it be up or down, you will change the temperature to 50°F.
Here comes another scenario, if you realize that your chicken or beef is not at the internal temperature that it needs to be, you can change the temperature if you so desire by doing the same process all over again.
Time Change
When you touch the temp/time button once, you change the temperature but if you want to change the time you will need to touch it twice.
You can change the time by touching the up and down arrow. When you touch the arrow keys, you will either increase or decrease the time by one minute. If you hold on to the up-and-down button buttons, the timer will increase or decrease in increments of 10, 20, and 30 minutes.
To start cooking your food you would place your food in the air fryer basket. You can just set your temperature and time, there is no need for you to worry about preheating. Put in the basket and base tray of your air fryer so that he can start cooking your food.
Now that your food is in the air fryer, you can press the start/pause button to start cooking your food.
Conclusion
I don’t know about you but I was excited about this post. Even though this is for specifically the Nuwave air fryer, it can still help others with their air fryer or see if their air fryer and the Nuwave air fryer are similar in some way. I hope you enjoyed yourself on this one and I will see you in the next.


